This page gets its start from an answer to an email message, like several other pages here. Here's the original message:
My name is Scott From Australia. My questions are, if I make a sword from spring steel would it have to be tempered and
heat treated for re-enactment purposes.(I think it would be, but
just checking anyway.) And if I wanted to fuller the blade without
forging, what would you recommend be the best tools to use.
Thanks Scott.
And the answer follows:
If the spring steel is already heat treated into being a spring, and if you
don't damage the heat treating by overheating the steel while grinding it,
then you wouldn't have to re-temper.
If it does get overheated, which is over 400 or 500 degrees, then it has to
be hardened before tempering. To harden, it has to be heated red hot, hot
enough until a magnet won't stick to it. Then it gets quenched, cooled very
rapidly in water or oil. That makes it as hard as it can get. After
hardening, you temper the hardness to to value you need. In your case, that
would probably be a Rockwell "C" hardness of about 48 to 52.
If the steel is not already heat treated, and if it's difficult to get it
done, try it without heat treating. The blade will be softer and easier to
nick, and if it gets bent it will stay bent instead of "springing" back to
straight. But at least you'd have a sword you'd made yourself. Also, there
are many companies that do commercial heat treating. If you can find one,
explain that you're a hobbyist and what you're doing and they may do it for
free or at a discount price. Tell them you want it annealed, then hardened
and tempered to "a good leaf spring temper." If that's not accurate enough
for them, then tell them that it should be a Rockwell "C" hardness of about
48 to 52.
To put a fuller in the blade without forging, I would use the edge of the
wheel of an angle grinder. I would mount or clamp the grinder above a metal
table with a guide fence along one edge so that I could slide the blade very
straight and evenly along under the grinding wheel. Lower the grinder a
little bit at a time. If you set the grinder so that the wheel is at a
slight angle, say 10 degrees, to the center line of the blade, you can make
a rounded fuller groove. This technique works well on a table saw for
cutting rounded grooves (often called coves) in wood. I've used it to make
wooden sword scabbards. More explanation of the cove cutting process is in
many woodworking books. Also see http://www.taunton.com/fw/features/techniques/28covemolding.htm I hope you try it - I'd like to have a fullered blade myself but haven't gotten around to trying it yet. Also, you could put a metal cutoff-saw grinding wheel on a table saw arbor and use it for cutting the groove just like people use a regular saw blade for those "cove" cuts in moldings.
Automotive leaf springs are very good steel for swords, but normally seem a
bit too thick. A good thickness is about 3/16 of an inch. Much thicker and
the sword will be too heavy to use for more than half a minute, unless
you're a lumberjack (or maybe a Conan-type barbarian)!
Another visitor asked about heat treating:
Hi Doug
I'm a South African interested in sword making but Africa is not the best
place to find information on the subject. I've surfed the internet but most
sites
cater for the more experienced craftsmen. There is a couple of small things I
need to know and will be grateful if you can help.
1) What is the difference between hardening, annealing and the process you
guys use to "soften" the hardness of the blade to make it less brittle after
the hardening process?
2)Can I use ordinary coal in the forge or must I use charcoal?
3)What techniques do I need to master if I do not want to use power tools?
Here's my answers:
1) "Hardening" is quenching the steel from it's 'critical' temperature, when
it's no longer attracted to a magnet, cooling it as rapidly as possible down
to say 200 deg. F or so. Then the steel is as hard as it can get and is
also quite brittle. This is the condition of the steel that good files are
made out of.
Annealing is heating the steel to its critical temperature and then cooling
it very slowly, say 50 deg. F per hour. A common way is to heat it to very
red and then bury it in a light insulating material. Vermiculite, lime or
dry ashes are commonly used. Commercial heat treaters slowly decrease their
oven temperature to accomplish the same effect. The steel is then as soft
as it can get.
For blades, after hardening the next process is called tempering, or drawing
the temper. It is heating the steel again, but to a very limited
temperature. For a sword blade it's around 500 or 550 deg. F, for example.
2) Your choice of fuel for the fire is based strictly on cost and convenience.
The steel doesn't care. It takes a lot of charcoal, and once coal was
discovered, far less charcoal was used. Knifemakers now often use
gas-burning forges, either natural (from oil wells) gas or LP/propane gas
from tanks.
3) If you don't use power tools, all you need to do is saw and file. Lots and
lots of filing. In fact, with enough filing you wouldn't need to saw. Or
if you forge a blade to shape, then you don't need to saw it (to shape, like
I did).
You should be able to find lots of information about blacksmithing and
knifemaking. Both of those sources will give information on fires, fuels
and heat treating. There are many web sites about both activities and some
have great amounts of detailed information.
On March 31, 2001 I received this email, which the sender gave me permission to publish:
Hello I just found your page and thought I would pass on a few tips from my
experiences. I am a custom knifemaker and have made swords. I agree that 5160
is an excellent steel to use for swords, you can also try 1050, 1060, 1075,
1084 these are all plain carbon steels and will work well for swords.
First: at the juncture of the blade and tang it is a good idea to have a
smooth transition between the blade and tang. Use a round file to make a
smooth transition between tang and blade instead of a sharp angle. This will
greatly reduce stress and possible breakage if you are going to actually use
the sword.
Second: If you are going to thread on the pommel make sure you have at least
3/4"- 1" of thread for strength, and the tapped hole in the pommel should
match this. Think drill press, essential machine. Also I do not recommend
welding the tang to the blade for a sword as this introduces a good
opportunity for breakage at the point of the weld. This has to do with
harmonic vibration in the sword when you hit something.
Just a couple of tips, my opinions of course. If you have any questions let
me know. I might not be able to answer them but I can probably find someone
who will know.
Sincerely, B. R. Tomberlin
Anvil Top Custom Knives
Then I asked him about publishing his email, and if he would take requests to make custom swords. Here's his answer:
You are very welcome and feel free to forward the requests. Lately that seems
to be the only swords I have made and the early medieval swords are the ones
I seem to be most interested in making. As for fantasy swords???????? just
depends on how much of a fantasy they are. I had one person ask if I could
make a forty pound sword, as he assured me that was what the original two
handed swords weighed. Needless to say that one doesn't exist except in his
mind. But I will give serious thought to any reasonable request. Also if you
have anybody who has questions about japanese swords I am a collector and
have at least some knowledge in the area.
Thanks for the correspondence
B.R. Tomberlin
anviltopp@aol.com
And for more information:
For info on types of steel for blades, go see http://www.cancom.net/~hnilica/metals.html
And to http://www.bladeforums.com/features/faqsteel.shtml
Steel
rec.knives FAQ http://www.agrussell.com/rec.knives/steel.htmlClick on "How To" at http://www.knives.com/frameset.html
See this newsgroup posting article about 5160 steel for sword blades.
Also see this article about forging big Claymore blades.
I copied a collection of discussion-group postings about bladesmithing from the SCA system called RIALTO.
For an interesting idea for a broadsword hilt crossguard, see Fig. 4 diagram. This idea came from a great book called "The Singing Sword" by Jack Whyte. For more information about Whyte's books and his version of how to make Excalibur, go see my Excalibur page.
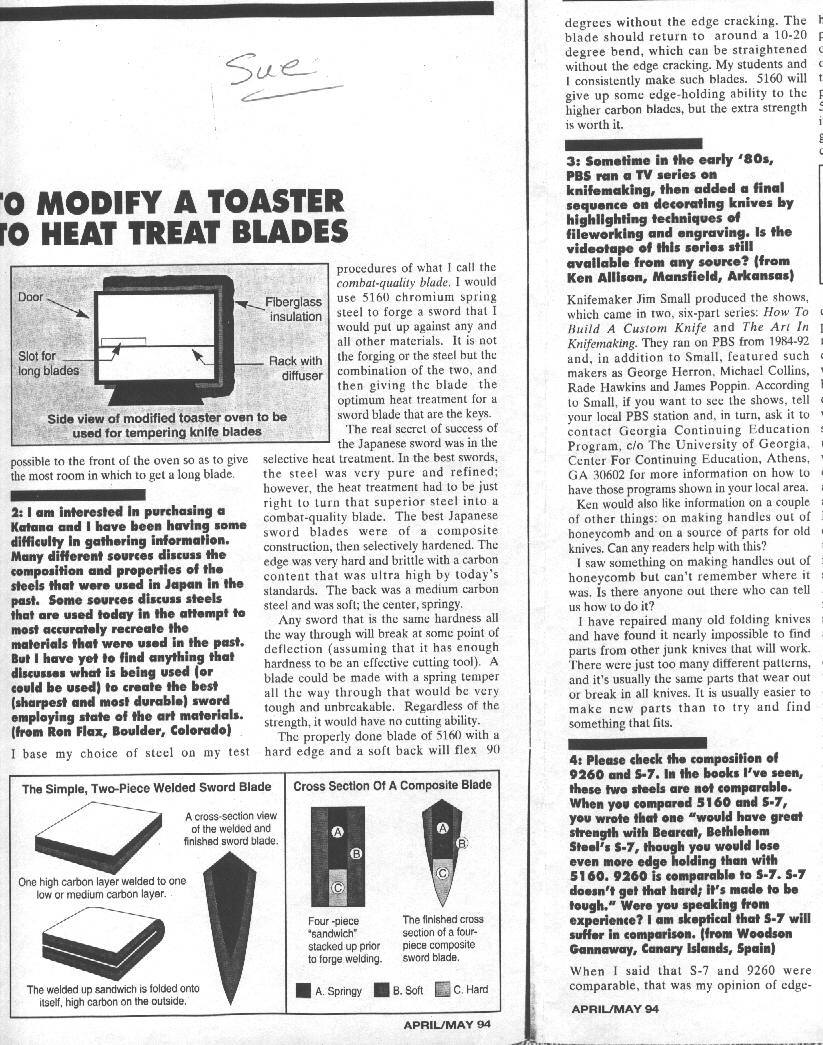
Someone wrote to professional bladesmith Wayne Goddard at Blade Magazine to ask about katana blades and the best steel for one. I scanned this article from pages 16 and 17 of the April/May, 1994 issue.
Damascus Steel
For more than you ever wanted to know about Damascus steel, go to The Key Role of Impurities in Ancient Damascus Steel Blades
It's a good, long, scholarly article with chemical analyses, photomicrographs and lots of information.
A short summary of how I've made my four sword blades.
Buy a bar of spring steel. I started with two kinds, SAE 1095 at one inch wide by 5/32 inch thick. The other is SAE 5160, two inches wide and 7/32 inch thick. Both are from Admiral Steel in Chicago. Admiral's address is on my main swordmaking page. You can order from their website.
After putting blue dye on it, I drew the outline of the blade shape I wanted onto the steel bar and cut out the shape with a metal-cutting band saw. See Fig. 1 diagram.
Then I put a 36-grit belt on the Kalamazoo belt grinder with the bevel-angle jig clamped on its table and spent 6 or 8 hours passing the blade back and forth.
When I bought the steel, the 1095 was sold in an eight foot bar, which Admiral kindly cut into two pieces for UPS shipping.
The 5160 is a 22-foot bar so they cut it into several pieces. I asked for pieces 40 inches long, forgetting that I needed a few more inches for the tang if I wanted a long rapier blade. See Fig. 3 diagram. Plan Ahead! It wasn't available at one inch wide, only wider. I wanted to make rapier blades so I ordered it two inches wide and cut it diagonally lengthwise into two blades from one 40 inch piece. It wasn't exactly a diagonal cut, not corner to corner. The line started a quarter inch from one corner and ended a quarter inch from the opposite corner, so the blank was 1/4 inch wide at the narrow end and 1-3/4 inch at the wider end. Again, see Fig. 1 diagram.
My 5160 blade stock is shorter than the 1095 so I cut a notch into the 1-3/4 inch wide end of a short stub tang on the end of the blade and welded in a long 1/4 inch Allen screw with its head cut off. Allen screws are made of stronger, better steel than ordinary bolts, and it gave me a strong tang pre-threaded for the pommel. See Fig. 2 diagram.
I used the same diagonal cutting and welded-on tang method for two daggers, too. One is hilted to match my first rapier, made from an uncut 48 inch piece of 1095 only 5/32 of an inch thick. They make a nice pair.
Blade Shape
The blade has a specific shape in two different ways, in profile and in section. Profile is the normal view you see, like when the sword is hanging on the wall. The section shape is what you'd see looking at the point when the blade is pointed directly at your eye. See Fig. 5 diagram for examples of blade shapes. The pupose of the Fuller in Fig. 5 'C' is to reduce the weight of the blade. Fig. 5 'A' makes the strongest, heaviest blade. The more blunt angle of its edge geometry makes it cut less well but stand up to impact better . Fig 5 'B' cuts better because the edge is a sharper angle but that also makes it less strong. The shape for the sharpest cutting edge is Fig. 5 'D'. The "Hollow Ground" edge is similar to the edge on a straight razor. But it would nick very easily and very badly if it hit anything hard, like another sword blade.
Heat Treating
I have to send the blades out to a commercial heat treating facility, though. That can cost $25 to $50 per sword blade. See the "Heat Treating" page.
There is also blade making information on my Broadsword page.
Tools:
A few people have asked about what it takes to make a sword, as far as tools are concerned. I'm beginning to think that my original answer of files, hacksaw and drill might be modified to just an angle grinder, a file and a drill.
As well as a regular grinding disk, you can put a thin cutting wheel on the angle grinder. With care and a few spare disks I'll bet you could cut out a whole sword blade. And then change from cutting to grinding disks to put the edge bevels on the blade and add the thickness taper. You only need the drill to make the starting hole through the cross guard. And then that hole needs to be filed square or rectangular, anyway.
The edge of a grinding disk should work well for putting a fuller (groove) in the blade, too. But we would have to be very careful to avoid cutting too deep into the blade!
--home ---back to Swordmaking Page----------- updated October 29, 2003